Sunday, 24 January 2016

Week 16 - Life Drawing - Feet


 Again this week I struggled getting into drawing but after the few sketches began getting used to it.

 Thankfully for the next pose we were allowed to either use ink or any two medias of our choice. I'd used ink before and really enjoyed it so decided to go with that. I started with a more watered down ink and built up the shadows. I really like how the face came out most of all and feel I could have done better with a bit longer.

We then tried another pose, still with ink. I used thick ink around the body to make the shape stick out which I think is what was lacking in the previous drawing.

I found a flat, square-shaped brush to use which made some really nice marks though still made a thick enough stroke when I added enough water/ink.

I did better with the shades but to do that I had to use much more water meaning that once it dried, though the colours looked better, the paper was very creased, even more so when the previous drawing dried.


Lastly we looked at drawing feet. We didn't have long to draw them in so I focused on getting the shape right and not so much on the shading. I drew light circles where each of the knuckles were to help me get the shape of the toes.
 
I had a very good view of each foot in the next pose and although I had the same amount of time, I quickly got down the basic shapes as well as some crosshatching as the dirt.
There was one last pose to draw the feet but unfortunately I had forgotten my glasses and my eyes were straining too much so had to stop here.

Saturday, 23 January 2016

Week 16 - Rendering Curved Surfaces

In previous lessons we had looked and the correct way of rendering but only on flat surfaces, so this time we looked at curved surfaces.

We were given a sketch from 3D artist Jordu Schell to practice on as it a very round creature.

The painting lasted about 1-1.5 hours so we didn't go into too much detail but it was a good practice of what we were taught.

Wednesday, 20 January 2016

Full Moon - Original Concepts

For this term's game, the brief asks for a 2D, one screen (no screen scrolling) game. We were to get into groups of 4-5 though our group only has 3 so we will have to work a little harder.

We decided on a game based on a werewolf from a tribe as there are a few similar legends.

We made a quick paper prototype to present and help it come together in our minds. As we each have to make at least one art asset and one script, we also assigned jobs to each other. All three of us feel more comfortable doing character designs but unfortunately we had to compromise. We decided that Cristian will make the background concepts and design the summoned enemy, Bryony will design the rest of the characters and make their sprite sheets, and I will design the item boosts and do the scripting as out of all three of us, I feel more comfortable with Unity.

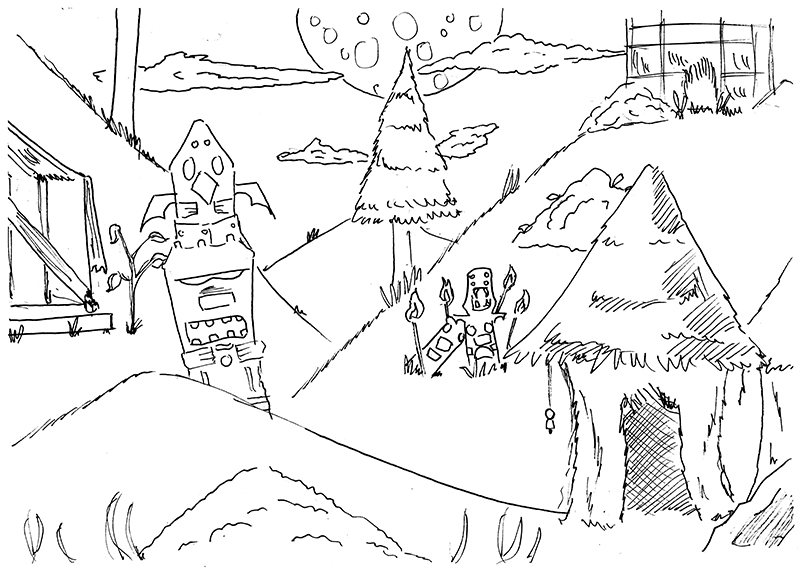
This is the quick background Cristian drew for our paper prototype. We wanted some bits to go with our theme but decided to not add any huts to later designs as we want the character to look more like an outcast.

Bryony sketched the designs for the main character. She added a mid-transformation design but to minimize the workload, we will just phase straight into day/night.
Although I am worried about our small group, I am actually looking forward to working in a group and creating a full game.

Friday, 15 January 2016

Week 14 - Statue Concepts

As I already knew we would be making a statue this term, I made a podium in the fountain of my battle arena. On this podium I wanted a  statue that would fit the image. I decided on a regal looking dwarf as the placement looks quite important anyway.

I had a style in mind and the words regal, Celtic, Dwarven and warrior. I looked online to find some ideas and found some statues with interesting patterns. I also knew I wanted a weapon incorporated in the statue so looked at some good designs.


I began by doing some pencil sketches. I really like the face design and think it can be interesting to model.

I wanted to get an anatomy reference picture but it was almost impossible to find any decent ones for dwarf proportions.

Although this isn't exactly the proportions I had in mind for my character, I used it a base, though I couldn't find any which I liked facing forward.

Using images I found online and cropping them, I patched together an idea for my character.

I then went over and sketched my version to use for my model.

I then searched for a 3D model with it's wireframe showing to help me actually model though this. I can't just make a taller male's body and shrink it as the proportions are different but this picture is also different to what I had planned so I'm not sure how this will turn out.

Week 14 - Anatomy Study - Muscles

After the skeleton assignment, we did a similar thing with muscles.

I made a sketch page of zoomed in sections of the body. This was very useful for me as I struggle with the correct build when drawing.

I drew back and front of the full body. I couldn't add as much detail as I would have liked but this was good practice and a good way to help me remember where each muscle is.

Tuesday, 12 January 2016

Week 14 - Paintover Technique

This lesson we began looking at the paintover technique used by many artists as it is a quick way to get ideas down.

 We were given a render of a simple 3D model to practice this technique on.

We were also given this plating image to use on the picture.


Using the overlay layer style I duplicated the plating image on each side of the object. I used the skew and warp transform tools to help move and edit the image to fit correctly as the angle differs on each. Lastly I added a logo on a screen layer and adjusted the levels to match the lighting and created a background by editing a few pictures of stars I found online.

Friday, 8 January 2016

Week 13 - Life Drawing - Faces

This session we looked at faces as that is also what we were modelling in 3D.


I hadn't drawn in a while so beginning with the quick sketches were especially useful.

Using charcoal we did a large, loose drawing. I wasn't feeling very motivated to draw so I spent very little time worrying about accuracy and used the charcoal very roughly, as well as using it sideways o get certain textures in without putting too much thought into it. I think this absentmindedness actually helped in this particular drawing.

Next we changed media. After the previous drawing I was feeling more motivated so got pencils as they are what I prefer using. I still wanted to draw roughly so the drawing is very sketchy and there are some very hard lines.


I really enjoyed this next pose as the position and composition looked much more interesting. I spent longer focusing on accuracy and details in this one so the marks are softer and shadows more accurate.

One part that really interested me was the hair as the highlights and lighting made it more complex than just lines.

The model turned round for the next drawing so that the half of the room that had her back in the previous pose could focus on the face in this one.

I had a straight on view so I really enjoyed getting in all the details I could see, although I would have preferred a bit longer to add the correct shading and maybe work on the hair.

Next the model turned round a little to the right. I also really liked how this pose looked because of the fringe to the curve of the back. This was only a quick drawing but I think I got the outline and shape accurate.

The model had a very fun face to draw as parts like the lips and chin are not typical and what I am used to drawing.

She then turned back round the other way meaning I had a better view of the full side of the face. This one was very rushed so I didn't get as much detail and accuracy as I would have liked.

Week 13 - Modeling a Face

In this weeks 3D lesson we looked at modeling a face using reference as we will soon be making a character statue.

We imported images into Maya, one on the side view and one on the front view. Using this I aligned the vertices in all directions. There was no reference for the back so there was a lot of guesswork involved and it took a while but this was good practice for my statue.

Thursday, 7 January 2016

Week 13 - Speedpaint

We started this terms visual design lessons with another speedpaint.


We looked at Sam Nielson's "Stealing Apples".

We didn't have very long and were told to work in layers, starting with the background and blocking in the colours. As last time I had trouble drawing quickly and so roughly as I usually spend my time adding detail. This is what I ended up with by the end of the lesson and although it is not finished, it was very good painting and colour practice (though the colours look different as I was looking at a printed copy instead).

Monday, 4 January 2016

Week 12 - Anatomy Study - Bones

Over the break our assignment was to research human bone anatomy. I draw humans often but almost never use any reference so this activity was very useful for me.

I looked at lots of different images as each one was slightly different. I found pictures of real bones more useful as I could see every indent. I also found an app which allowed me to move around the bone and get a better image of it. I tried sketching the more important and detailed parts.

Drawing the full skeleton was difficult as there are many very small bones and everything has very specific measurements.
After this assignment I found sketching people easier as I now have a basic understanding of proportions and structure.


Wednesday, 9 December 2015

Week 12 - Speed Painting

We looked at a speed paint portrait in this lesson. We were told to work very small and get down the main shape with a large brush to get us used to drawing quickly.

It was very odd painting so roughly. I was so zoomed out I couldn't actually see all these brushstrokes very clearly. I had trouble doing this an began sketching it out before getting told off for doing lines. So I went back into rough painting and by the end I was relatively happy with the accuracy.

I then zoomed in a little and started blending the strokes together with the mixer brush tool. As I was having problems with my computer I ended up having less time than the others but I am happy with the way it looks now, even if it isn't finished.