Thursday, 7 January 2016

Week 13 - Speedpaint

We started this terms visual design lessons with another speedpaint.


We looked at Sam Nielson's "Stealing Apples".

We didn't have very long and were told to work in layers, starting with the background and blocking in the colours. As last time I had trouble drawing quickly and so roughly as I usually spend my time adding detail. This is what I ended up with by the end of the lesson and although it is not finished, it was very good painting and colour practice (though the colours look different as I was looking at a printed copy instead).

Monday, 4 January 2016

Week 12 - Anatomy Study - Bones

Over the break our assignment was to research human bone anatomy. I draw humans often but almost never use any reference so this activity was very useful for me.

I looked at lots of different images as each one was slightly different. I found pictures of real bones more useful as I could see every indent. I also found an app which allowed me to move around the bone and get a better image of it. I tried sketching the more important and detailed parts.

Drawing the full skeleton was difficult as there are many very small bones and everything has very specific measurements.
After this assignment I found sketching people easier as I now have a basic understanding of proportions and structure.


Wednesday, 9 December 2015

Week 12 - Speed Painting

We looked at a speed paint portrait in this lesson. We were told to work very small and get down the main shape with a large brush to get us used to drawing quickly.

It was very odd painting so roughly. I was so zoomed out I couldn't actually see all these brushstrokes very clearly. I had trouble doing this an began sketching it out before getting told off for doing lines. So I went back into rough painting and by the end I was relatively happy with the accuracy.

I then zoomed in a little and started blending the strokes together with the mixer brush tool. As I was having problems with my computer I ended up having less time than the others but I am happy with the way it looks now, even if it isn't finished.

Thursday, 3 December 2015

Week 12 - Life Drawing


In our previous visual design lesson we were asked to watch a video on anatomy and skeletons for our next life drawing session.


We did a quick sketch and labeled the parts which the teacher read out to us.


We turned our boards sideways, drew a line down the middle, and used these smaller areas to draw close-ups. I really enjoyed drawing the face as there is a lot more detail in a more concentrated area.


I used the side of the charcoal a lot in these drawings as I wanted to draw in a sketchy manner though I think my original more detailed style looks better.


Tuesday, 1 December 2015

Week 11 - Sound and Ambiance

These last couple of weeks I've been focusing on the scripting and feel of my  game.

I added a plane with a pavement material so that when you look out the window you aren't just looking at nothing. I thought this was a good object to use to connect my sounds to. I attached a soundtrack from YouTube (Up the Spirit Cavern Walls converted with http://www.youtube-mp3.org/) to this plane as well as a sound effect of birds in the background (found on https://www.freesound.org/). I set them both to play on awake and loop. I adjusted the volumes too, making the sound effect much quieter than the soundtrack so that it doesn't distract from it but you can still hear it occasionally which I think gives it a much more realistic and deeper feel.

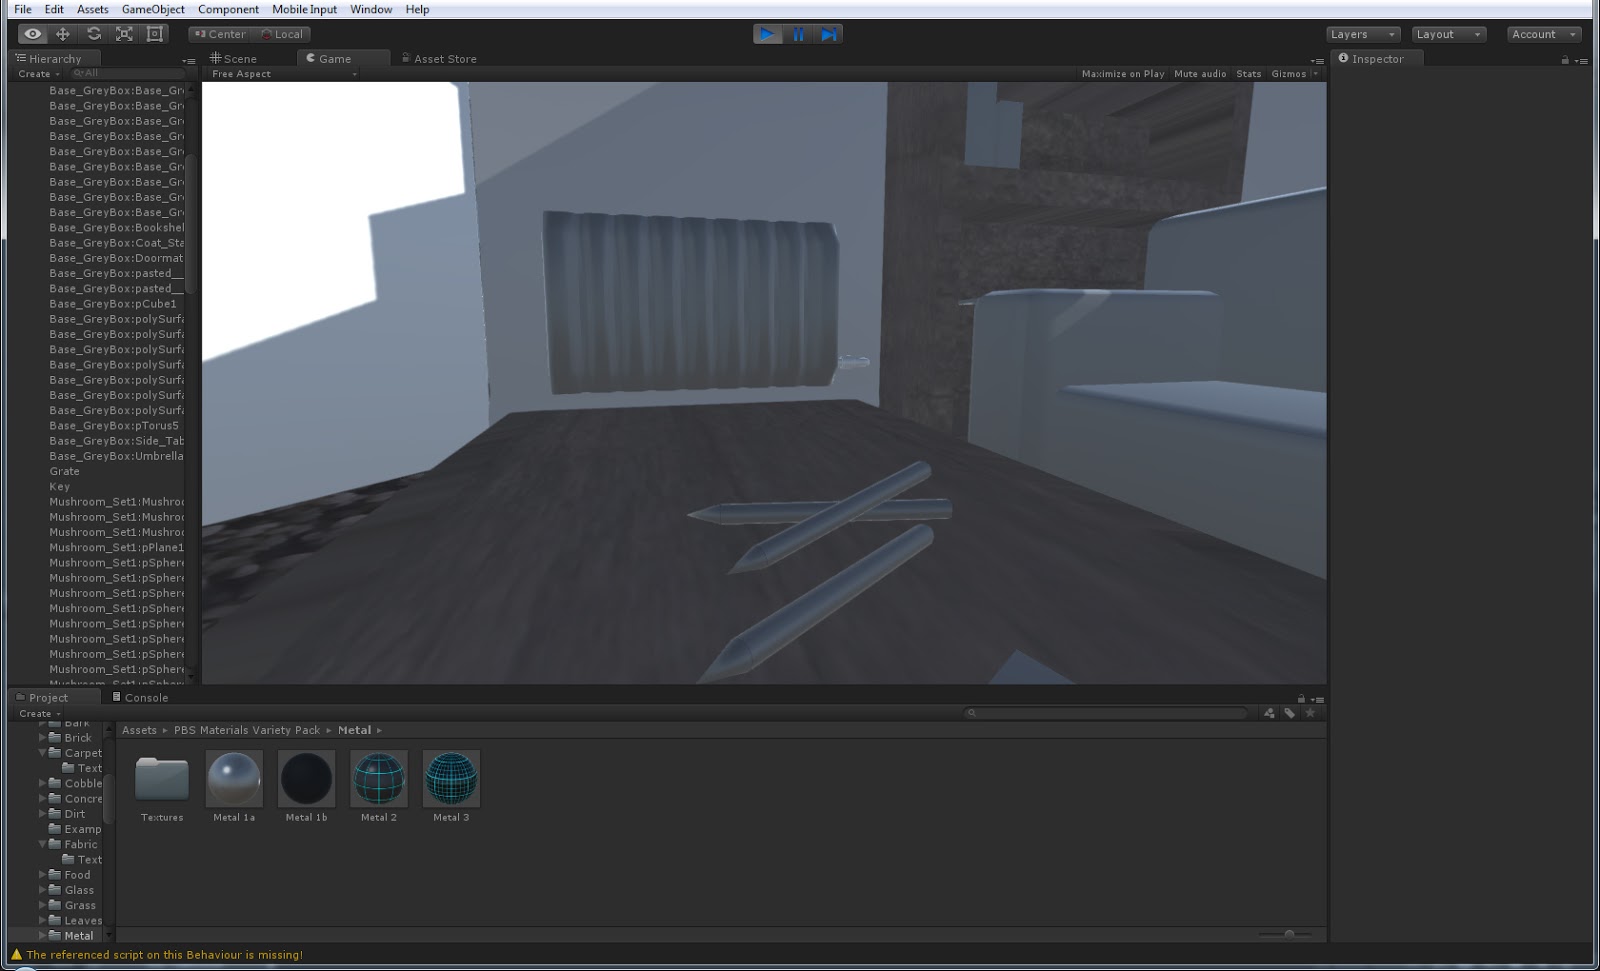
 I had added lights as well as a large window but I still felt the room felt very dark and dull, as you can see in the screenshot above. I found some scripts that were downloaded with the standard assets pack in unity. I tried adding the bloom script to the main camera in the FPS controller but didn't think it gave it the right affect.

Then I found the bloom and flares script which made everything much lighter. I wanted it to be morning so it wouldn't be very bright so I feel this is just the right amount of light.

Friday, 27 November 2015

Week 10 - Anthropomorphic Character/Creature Design

This week's assignment was to design an anthropomorphic character. We have done some character designs before but anthropomorphic designs are different as the way you incorporate an animals features must be more realistic but subtle.

I kind of already had an idea of the sort of character I wanted to design. I wanted to make some sort of  seller/trader amphibian character so I sketched some looks on paper to start off with.

I then went and made a quick mindmap of frogs, there colours and features to help make my character more realistic.

In the lesson I began sketching the face and basic body shape, skinny with long legs. I added some block colour. I saw how most frogs have patches and wanted to add vitiligo to the skin as a more human version of the dark skin.

I tried to fully paint the concept but couldn't get the right textures on the skin.

I couldn't quite get the right depth in the painted version so I put the sketch layer on top. I much prefer how this looks. It has all the details that just the paint doesn't have.
I am happy with how the character looks, I think it has a good balance of both human and frog features while still having enough character to hold up. I would like to add more details to the clothes or more wares attached to the backpack which is more like the character I first imagined as well as I would like a slimier texture to the skin.

Friday, 20 November 2015

Week 09 - Adding materials

As I was looking around in my walking simulator, I noticed that the size of the character in comparison to the objects in the room made it very difficult to tell what things were. As a normal sized character things are more obvious as you can see the whole object, even if it is just a greybox whereas when you are small and on the floor, everything just looks the same.


I decided to download some free material packs from the asset store. We aren't supposed to texture as it would take too long but I felt I needed at least some basic materials in my game. You can't select faces in Unity so when you add a material, it adds it to the whole object. Because of this I went back into Maya and separated some faces from objects such as the floor and part of the lights.

In this screenshot you can see that I used a glass texture for the window. I needed this to bring some light into the room as even with lights it was too dark. Unity has a pre installed glass effect which I had previously tried using. It made the object see through but it was completely invisible and did not look like glass at all so I decided to use the one from the pack which looks like it has a rough glass texture.

I added a metal material to the key as before it completely blended into the book underneath and most people who tested the game completely walked past it. One problem I found is that the materials stretched on each face causing strange patterns like what happened here. I also had the same problem when adding a material to the sofas. I don't think this will be too much of a problem as it is only supposed to be a greybox in the first place.

Thursday, 19 November 2015

Week 09 - Life Drawing

First off we did five 3 minute  poses. I arrived a little late so didn't have time to start the first one.

We looked at perspective in this session. There were some pieces of paper on the floor around the model which we could use to help find the horizon line and vanishing point. Unfortunately I didn't use these and went straight in to drawing the figure with just a basic idea of where the horizon line was. I added the paper after but found it much much harder this way round.

In the next pose I very lightly sketched the paper on the floor (though you can't see it clearly in this photo). Using pencils made it much neater and more accurate, though this also means it takes more time to draw.

In this picture you can see the lines better. I'm actually quite with this as it is very accurate. My usual problem is placing the feet and proportions as I can't always tell where I should be drawing parts.

Next we drew around the figures and added the detail to the rest of the room. This was a lot of fun and a good way to quickly understand perspective.

Lastly we were allowed to do whatever we wanted. As I hadn't used a felt tip before but had seen others use it, I decided to have a go.

I wasn't feeling very good and couldn't bring myself to add much detail as I usually do so this was a great way to very roughly draw the body.

Tuesday, 17 November 2015

Week 09 - Value, Form and Lighting - Armored Tank

During this week's lesson we watched a video on lighting.

We were given a blank image of these boxes where we used what we learned from the video to colour them in. This was really useful as I'd never learned these rules before.

Our assignment was to create an armored tank to show what we learned. I created a mindmap of some tanks to help with my design as I'm not good at machinery.

Using features from different tanks in the mindmap I made a sketch of a tank.
 Next I made the lineart. As I made most of the lines straight, I held down shift on Photoshop to ensure a neat image.
 I used fill to colour each section as the lineart was already neat enough to use.
 Without the black lines it is easier to see the form of the tank.I made lots of slanted and odd ledges so it was difficult to work out what shade each part needed.
Although I didn't fully paint it this was good practice as I had to keep in mind which direction the light was coming from and work it out as I went along.

Week 09 - Axe Prop

Today I decided to work on some of my props for my battle arena.

 I started sketching an axe and a sword, as I had included weapons in my mindmap. I knew I wanted some sort of Celtic design/pattern on it so I tried some out. Next I made a quick model in Maya. I left it relatively simple to keep the triangle count as low as possible as most of the detail could just be added on with a texture.


 I rendered the model in Maya and saved the picture. I then opened it in Photoshop, copied it twice and edited the levels to make it clearer to see.


I wanted to think about what sort of designs I could use without having to sketch it out each time or texture it and found painting over the model in Photoshop to be very quick and helpful. I thought of what both a wood and metal axe would look or leather parts on the metal. I like how all of these look though I feel I could add more Celtic style patterns in the metal to make them all look like they are part of the same scene.
I will definitely use this again, probably for sketching the patterns on the fountain or column.