Friday, 15 January 2016

Week 14 - Statue Concepts

As I already knew we would be making a statue this term, I made a podium in the fountain of my battle arena. On this podium I wanted a  statue that would fit the image. I decided on a regal looking dwarf as the placement looks quite important anyway.

I had a style in mind and the words regal, Celtic, Dwarven and warrior. I looked online to find some ideas and found some statues with interesting patterns. I also knew I wanted a weapon incorporated in the statue so looked at some good designs.


I began by doing some pencil sketches. I really like the face design and think it can be interesting to model.

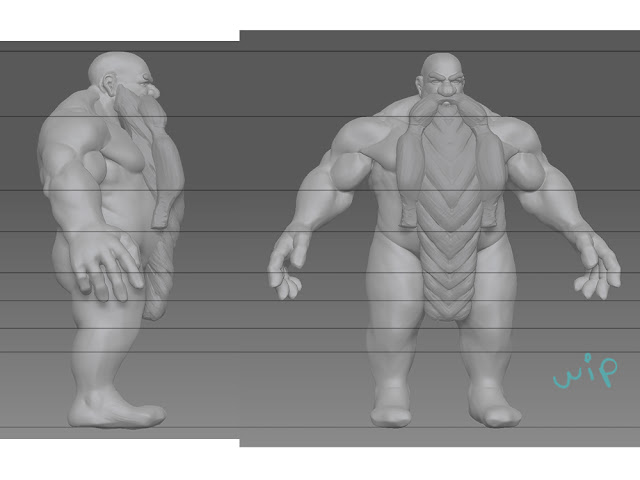
I wanted to get an anatomy reference picture but it was almost impossible to find any decent ones for dwarf proportions.

Although this isn't exactly the proportions I had in mind for my character, I used it a base, though I couldn't find any which I liked facing forward.

Using images I found online and cropping them, I patched together an idea for my character.

I then went over and sketched my version to use for my model.

I then searched for a 3D model with it's wireframe showing to help me actually model though this. I can't just make a taller male's body and shrink it as the proportions are different but this picture is also different to what I had planned so I'm not sure how this will turn out.

Week 14 - Anatomy Study - Muscles

After the skeleton assignment, we did a similar thing with muscles.

I made a sketch page of zoomed in sections of the body. This was very useful for me as I struggle with the correct build when drawing.

I drew back and front of the full body. I couldn't add as much detail as I would have liked but this was good practice and a good way to help me remember where each muscle is.

Tuesday, 12 January 2016

Week 14 - Paintover Technique

This lesson we began looking at the paintover technique used by many artists as it is a quick way to get ideas down.

 We were given a render of a simple 3D model to practice this technique on.

We were also given this plating image to use on the picture.


Using the overlay layer style I duplicated the plating image on each side of the object. I used the skew and warp transform tools to help move and edit the image to fit correctly as the angle differs on each. Lastly I added a logo on a screen layer and adjusted the levels to match the lighting and created a background by editing a few pictures of stars I found online.

Friday, 8 January 2016

Week 13 - Life Drawing - Faces

This session we looked at faces as that is also what we were modelling in 3D.


I hadn't drawn in a while so beginning with the quick sketches were especially useful.

Using charcoal we did a large, loose drawing. I wasn't feeling very motivated to draw so I spent very little time worrying about accuracy and used the charcoal very roughly, as well as using it sideways o get certain textures in without putting too much thought into it. I think this absentmindedness actually helped in this particular drawing.

Next we changed media. After the previous drawing I was feeling more motivated so got pencils as they are what I prefer using. I still wanted to draw roughly so the drawing is very sketchy and there are some very hard lines.


I really enjoyed this next pose as the position and composition looked much more interesting. I spent longer focusing on accuracy and details in this one so the marks are softer and shadows more accurate.

One part that really interested me was the hair as the highlights and lighting made it more complex than just lines.

The model turned round for the next drawing so that the half of the room that had her back in the previous pose could focus on the face in this one.

I had a straight on view so I really enjoyed getting in all the details I could see, although I would have preferred a bit longer to add the correct shading and maybe work on the hair.

Next the model turned round a little to the right. I also really liked how this pose looked because of the fringe to the curve of the back. This was only a quick drawing but I think I got the outline and shape accurate.

The model had a very fun face to draw as parts like the lips and chin are not typical and what I am used to drawing.

She then turned back round the other way meaning I had a better view of the full side of the face. This one was very rushed so I didn't get as much detail and accuracy as I would have liked.

Week 13 - Modeling a Face

In this weeks 3D lesson we looked at modeling a face using reference as we will soon be making a character statue.

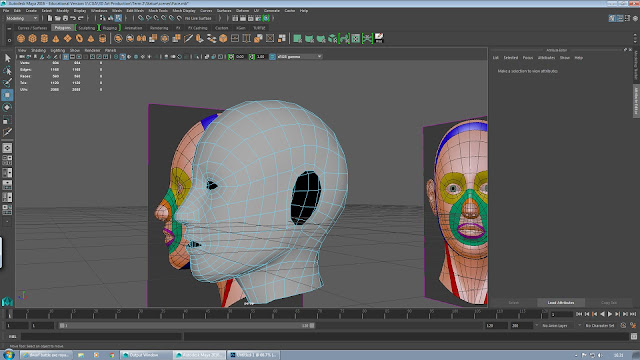
We imported images into Maya, one on the side view and one on the front view. Using this I aligned the vertices in all directions. There was no reference for the back so there was a lot of guesswork involved and it took a while but this was good practice for my statue.

Thursday, 7 January 2016

Week 13 - Speedpaint

We started this terms visual design lessons with another speedpaint.


We looked at Sam Nielson's "Stealing Apples".

We didn't have very long and were told to work in layers, starting with the background and blocking in the colours. As last time I had trouble drawing quickly and so roughly as I usually spend my time adding detail. This is what I ended up with by the end of the lesson and although it is not finished, it was very good painting and colour practice (though the colours look different as I was looking at a printed copy instead).

Monday, 4 January 2016

Week 12 - Anatomy Study - Bones

Over the break our assignment was to research human bone anatomy. I draw humans often but almost never use any reference so this activity was very useful for me.

I looked at lots of different images as each one was slightly different. I found pictures of real bones more useful as I could see every indent. I also found an app which allowed me to move around the bone and get a better image of it. I tried sketching the more important and detailed parts.

Drawing the full skeleton was difficult as there are many very small bones and everything has very specific measurements.
After this assignment I found sketching people easier as I now have a basic understanding of proportions and structure.


Wednesday, 9 December 2015

Week 12 - Speed Painting

We looked at a speed paint portrait in this lesson. We were told to work very small and get down the main shape with a large brush to get us used to drawing quickly.

It was very odd painting so roughly. I was so zoomed out I couldn't actually see all these brushstrokes very clearly. I had trouble doing this an began sketching it out before getting told off for doing lines. So I went back into rough painting and by the end I was relatively happy with the accuracy.

I then zoomed in a little and started blending the strokes together with the mixer brush tool. As I was having problems with my computer I ended up having less time than the others but I am happy with the way it looks now, even if it isn't finished.

Thursday, 3 December 2015

Week 12 - Life Drawing


In our previous visual design lesson we were asked to watch a video on anatomy and skeletons for our next life drawing session.


We did a quick sketch and labeled the parts which the teacher read out to us.


We turned our boards sideways, drew a line down the middle, and used these smaller areas to draw close-ups. I really enjoyed drawing the face as there is a lot more detail in a more concentrated area.


I used the side of the charcoal a lot in these drawings as I wanted to draw in a sketchy manner though I think my original more detailed style looks better.


Tuesday, 1 December 2015

Week 11 - Sound and Ambiance

These last couple of weeks I've been focusing on the scripting and feel of my  game.

I added a plane with a pavement material so that when you look out the window you aren't just looking at nothing. I thought this was a good object to use to connect my sounds to. I attached a soundtrack from YouTube (Up the Spirit Cavern Walls converted with http://www.youtube-mp3.org/) to this plane as well as a sound effect of birds in the background (found on https://www.freesound.org/). I set them both to play on awake and loop. I adjusted the volumes too, making the sound effect much quieter than the soundtrack so that it doesn't distract from it but you can still hear it occasionally which I think gives it a much more realistic and deeper feel.

 I had added lights as well as a large window but I still felt the room felt very dark and dull, as you can see in the screenshot above. I found some scripts that were downloaded with the standard assets pack in unity. I tried adding the bloom script to the main camera in the FPS controller but didn't think it gave it the right affect.

Then I found the bloom and flares script which made everything much lighter. I wanted it to be morning so it wouldn't be very bright so I feel this is just the right amount of light.

Friday, 27 November 2015

Week 10 - Anthropomorphic Character/Creature Design

This week's assignment was to design an anthropomorphic character. We have done some character designs before but anthropomorphic designs are different as the way you incorporate an animals features must be more realistic but subtle.

I kind of already had an idea of the sort of character I wanted to design. I wanted to make some sort of  seller/trader amphibian character so I sketched some looks on paper to start off with.

I then went and made a quick mindmap of frogs, there colours and features to help make my character more realistic.

In the lesson I began sketching the face and basic body shape, skinny with long legs. I added some block colour. I saw how most frogs have patches and wanted to add vitiligo to the skin as a more human version of the dark skin.

I tried to fully paint the concept but couldn't get the right textures on the skin.

I couldn't quite get the right depth in the painted version so I put the sketch layer on top. I much prefer how this looks. It has all the details that just the paint doesn't have.
I am happy with how the character looks, I think it has a good balance of both human and frog features while still having enough character to hold up. I would like to add more details to the clothes or more wares attached to the backpack which is more like the character I first imagined as well as I would like a slimier texture to the skin.